HTML & CSS - Week 1
The aim of the HTML/CSS course is to give you a solid understanding of the structure of a web page, and the components used in making it. In week one we'll put together a first, simple web page, and introduce some basic tags and styles.
HTML
Hyper Text Markup Language is the code used to structure a web page. It defines things like headings, paragraphs, images, tables and lists, but it also creates the layout of the page. The way it works is very simple - it uses 'tags' to label your content. You do this with a start tag and an end tag, and the content goes between the two. Tags are enclosed by angled brackets, and the closing tag is different from the opening tag because it has a '/' in front of the tag name.
Let's look at that structure. The tag to define a paragraph is simply called 'p', and here's an example of it below. Hover the mouse over each bit for an explanation:
And that's pretty much all you need to know to make a web page! At least for now ;)
The Structure of a Web Page
Actually, there's a bit more to it than that. For starters, there's a certain structure that we need to put around our page so that the browser (the app you're using to view the page) knows how to treat it. This too consists of tags, and at it's simplest is a 'head' and a 'body', with html tags wrapping everything (so the browser knows that it's HTML). This bit is often called the 'boilerplate'. No, I don't know why either. Actually, I do now because I just looked it up. But it's not very interesting.
Boilerplates can get pretty complicated in these modern times of multiple standards, clients and options, but you can use this very simple version to get you started:
<html>

<head>
<title> The title you want to appear in the browser tab </title>
</head>

<body>
    Everything that appears in your page goes here
</body>

</html>
The main things to notice are:
- The head always contains a title, used by the browser and search engines.
- It can also contain links to other resources used in your page (fonts, styles, scripts), and extra information about it.
- The body contains everything that will appear in your page.
- HTML tags wrap around the whole thing.
- Put all this in a file, give it a name ending in .html, and it will open like magic in a web browser.
Some basic tags
We've already seen the paragraph tag, above. Here are a few others:
- <h1> - defines a main heading, like the headline to a story
- <h2> - a sub-heading. You can also use h3-h6, for a whopping 6 levels of heading
- <p> - defines a paragraph of text
- <br> - makes a 'line break', or moves onto a new line. Doesn't need a closing tag (?!)
Let's use a few of these to make our first web page, which, just like a first anything made in a new programming language, will output the message "Hello World!". Make a new file on your computer, and call it index.html . Open it in a text editor, and copy in the boilerplate code above. Then, inbetween the <body></body> tags, add:
<h1>First ever webpage!</h1>

<h2>A page which, in the time-homoured tradition, outputs Hello World to the browser</h2>

<p>Hello World!</p>
Open the file in your browser (double click it, or drag it in) and you should see something like this:

Not bad! Could be prettier though. And that's where we come to...
CSS - Cascading Style Sheets
In the old days, as people tried to make their grey old pages look pretty, the code started to get very messy very quickly. CSS is as a way to fix this. By separating the structure from the styles, you can change one without having to wade through the other. Also, you can define a style once, and use it over and over again, saving code and making sure that your paragraphs (or whatever else) match each other.
We can include CSS in three ways. In most cases, the best way is through a separate stylesheet (we'll come to this later). Another way is to include the stylesheet in our HTML file, using <style> tags; this is the way we'll focus on for now. The final way is to include the styles inline, as an 'attribute' within the HTML tag; this is handy if you just want to alter a single element.
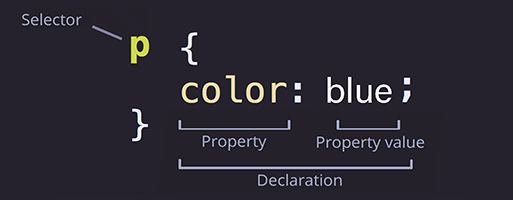
So how does CSS work? The first part of a CSS rule is the selector: that tells you what elements it applies to. Then you have a property: the thing you're changing. And then you have the value that you're setting it to. Altogether it looks a bit like this:

Some basic styles
The different aspects of an element that we can style are called properties, and different properties accept different values. To demonstrate this, we'll look at 4 different properties and use each in our Hello World code:
- font-family - which font the element should use to display text
- font-size - How big to display it, in various different units
- color - the colour of the text, either a name (like 'red') or a numerical description, eg rgb(200, 0, 255)
- background - The colour of the background. Note US spelling of color
We'll use these styles to change the look of the Hello World web page. First, add a couple of new paragraphs after the one you already made, so we've got a bit more to look at. Then put opening and closing style tags in the head section, underneath your title. Then, inside the style tags, put some declarations for the body, h1, h2 and p tags. Here's an example:
<html>

<style>
body {
	background-color: rgb(255, 200, 0);
}
h2 {

	font-size:16px;
}
p {
	font-family: sans-serif;
	color: steelblue;
}
</style>
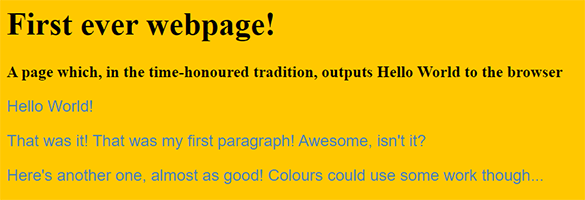
Which gives us:

A look at what's going on
Let's go through the code we've added, and discuss what it's doing.
body
CSS is 'Cascading', which we'll come to later, but it is also inherited: if you apply a style to the body, it will also affect any tags within the body. So change the text color here, and it will change the color of h1, h2 and p, unless you specify a different colour for those.
background-color
This is our first property, and you'll notice we use a colon(:) to separate the property from its value. There are different ways to define colours, and here we've used the rgb method; the three numbers in the brackets stand for the amount of red, green and blue, each of which can be a number between 0 and 255. This gives us a total of over 16 million possible colours. To learn more about colour, click here.
font-size
We've changed the size of the text for the h2 tag. The value we've used is 16px, and the px bit is short for pixels. But there are lots of other units you can use. Some are absolute, like px, pt, cm, while others are relative, like %, em, vw. Relative values help with scaling on different devices.
p
Usually you'll want to apply more than one style to an element, and that's what I've done with the p tag. Each property is separated with a semi-colon(;). It's a good idea to always put one of these at the end of a declaration, so that it's ready for the next one.
font-family
The value of this is the name of the font you want to use. You can only use fonts that exist on the computer running the website, so you will often see more than one listed, eg font-family: Arial, Helvetica, sans-serif; The browser goes through the list until it finds one that the computer has. Sans-serif is a generic name, so this example say, "Use Arial, and if you can't find that use Helvetica, and if you can't find that then any sans-serif font will do."
color
This is the color of the content, ie the text rather than the background. Here' we've used a different way to specify it - named colours. Named colours are quick to add, but there aren't so many of them, and they might not all work in all browsers. You can find a list of them here.
Finally...
You can see the page I made by clicking here (opens in a new tab). If you're stuck, you may want to see all the code for it. Well here's the trick: just right-click anywhere on the page, and choose 'View Page Source', and a new tab pops up with the entire code for that page. Try it!
I also made this page. You can do the same with it, and examine every line of code that makes it work the way it does. How fun is that?
